


Contents
Most anglers prefer to use homemade floats rather than store-bought ones. The thing is that most fishing enthusiasts love the process of making various fishing accessories on their own. It is not difficult to make a float, especially since any material that has positive buoyancy plus a little imagination is suitable for this. How to color it is a matter of taste and color preferences. This article will help determine the type of float, its shape, as well as the material for its manufacture.
How to make a float with your own hands
A float is a critical element of tackle that is easily made by any angler’s own efforts. Of course, you will have to practice, because the first samples will be far from ideal. But over time, the floats will get better and better, after which the moment will come when their own variants of floats will begin to appear.
Maybe someone has already been involved in this process, then this article will help to determine the shortcomings and miscalculations, which will make it possible to make a more perfect version.
From what and what kind of float to make

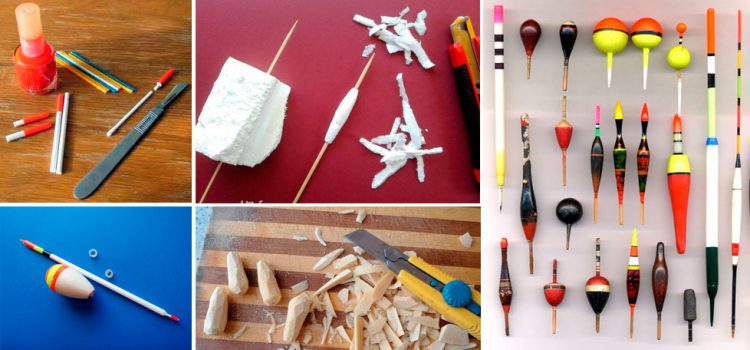
For the manufacture of a float, any materials that do not sink in water and are easily processed are suitable. Such materials can be safely attributed:
- feathers of feathered birds (goose, swan, etc.);
- a plastic tube (from under cotton candy, etc.);
- dar;
- Stêrfiroş.
The material is selected depending on what kind of fish you plan to go. When choosing a material, one should take into account such a moment as the presence of flow. In stagnant water, any of the proposed float options will work fine. As for fishing on the course, everything is much more complicated here.
Each material has its own buoyancy characteristics. This means that floats of different sensitivity can be obtained from these materials. If you plan to catch crucian or roach, then a goose feather or plastic tube float can easily cope with this task, and if you plan to catch more powerful fish, such as carp, perch, bream, then it is better to use less sensitive floats that can withstand powerful bites. Therefore, when starting to manufacture a float, you need to clearly know what it is for and in what conditions it will have to fish.
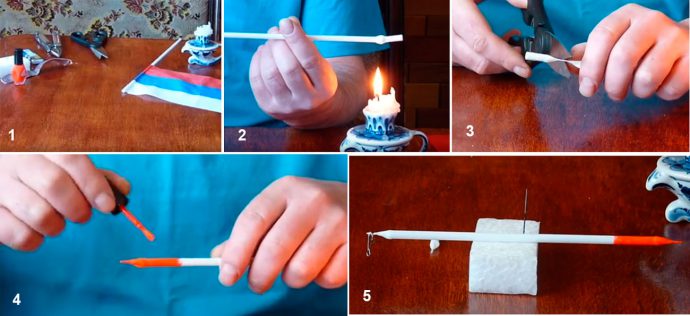
How to make a feather float
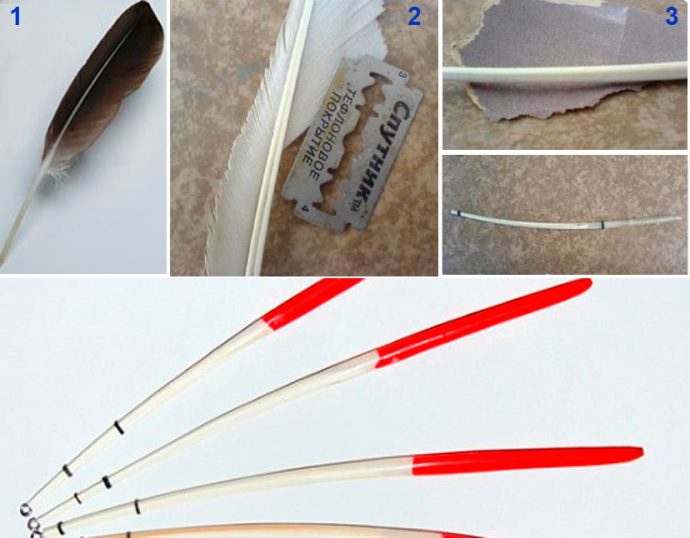
This float is the most sensitive, due to its lightness and peculiar shape close to ideal. With it, you can even fix the usual touches of fish, not to mention bites. With this float, many anglers began their fishing careers, later preferring modern floats. The fact is that in the recent past, apart from a goose feather float, it was difficult to find something more suitable. Making a float comes down to elementary actions aimed at cleaning the body of the float from excess goose down. At the same time, it can be made somewhat shorter, slightly shortening it, if necessary. Cleaning should be done very carefully so as not to damage the body of the float and not violate its tightness. This can be done with a regular blade or with a lighter, removing excess fluff. After such a procedure, the body of the float will have to be treated with fine sandpaper, removing traces of burnt feathers.
It remains to fix the float on the main line, and it is ready to use. As a rule, an ordinary nipple is used for this, cutting off two rings about 5 cm wide. The nipple is easily put on the body of the float, but before that they must be passed through the fishing line. The use of a nipple has its drawbacks. Usually these rubber bands are enough for only one season, as the rubber loses its properties under the influence of sunlight. So what! Putting new rubber bands is not so difficult, but everything is very simple and affordable. In addition, rubber copes very well with its functions, compared to other materials.
The normal body color of a goose feather float is white, so it is not always noticeable, especially in cloudy weather. So that it can be seen at a considerable distance and not particularly strain your eyesight, the float can be painted. To do this, you can take ordinary nail polish, especially since you don’t need a lot of it and it is in almost every family. The float should not be painted completely, but only the part that will rise above the water. In this case, the float can be seen and the fish will not be alarmed.
As a rule, the manufacture of such a float takes a minimum of time, and the result is not even bad at all. By the way, goose feather floats can be purchased at a fishing store, which indicates their effectiveness.
Floats from goose or swan feathers, in case of loss due to a cliff, are easily made near a reservoir. Why? Yes, because feathers are easy to find near a pond or lake. It remains only to clean the pen and fix it on the fishing line.
Feather float video
Do-it-yourself goose feather float
How to make a float out of a plastic tube
Such a tube can be found in crowded places where people spend their free time drinking cotton candy or waving flags. Similar tubes are used to hold balloons, etc. A float from such a tube can be called an analogue of a goose feather float, although it requires special refinement. It differs from a goose or swan float in greater strength and a more modern appearance. In other words, a plastic tube is ideal for making a float.
The main task in the manufacture of such a float is to make the stick airtight. To do this, you just need to heat the edges with a lighter and carefully solder the hole in the tube with some object.
A soldering iron is also suitable for such purposes. In this case, you can do without open fire. With a certain skill, you can solder the edges so that no one will notice.
There is another, the simplest option – this is to introduce a drop of silicone into the cavity of the tube from one side and the other, and the problem will be solved. You just need to give a little time later for the silicone to harden. It is better to use colorless silicone, as it has the best adhesive effect.
Having made the tube waterproof, they begin to attach the future float to the fishing line. If the color of the float does not satisfy the fisherman, then it can be painted in the same way as a goose feather float. In general, the mounting technology is identical to the first option, although you can come up with your own mounting option.
Making a plastic tube float will take almost the same amount of time as making a goose feather float. In both cases, you need to find a blank for the body of the float. This may be the only difficulty.
Video “How to make a float from a plastic tube”
HOW TO MAKE A FLOAT IN 5 MINUTES. How to make Super Float fishing.
How to make your own float out of cork or foam

The manufacturing technology of such floats is identical, despite the fact that different materials are used. The only difference is that the cork is easier to process, and under certain conditions it is not necessary at all. The sensitivity of such floats is somewhat lower, but they are suitable for catching trophy fish or predatory fish. The fish must be strong enough to sink such a float. When fishing for live bait, such floats are ideal, because they do not allow him to move around a larger area. When biting a pike or zander, the float will immediately react.
Any angler who has at least some skills in working with tools and materials can make a float from foam or cork. In this case, high-density foam should be taken, otherwise a normal float will not work. First you need to cut a workpiece of a certain shape, after which it is cultivated on a grinding machine or in another suitable way. A hole is made in the center of the workpiece (it can be drilled), through which, for example, a lollipop stick or the same stick is inserted, as in the manufacture of a float from a bird feather. The only difference is that such a tube does not need to be soldered, since buoyancy will be provided by the materials from which the body of the float is made (foam or cork). Further, a nipple is mounted on the tube, and the float itself is attached to the tackle. After that, you can go fishing. Painting is optional, depending on fishing conditions. For painting it is better to use waterproof coloring materials.
Video “How to make a cork float”
🎣 DIY floats #1 🔸 Cork and pen
Do-it-yourself wooden float
Despite the fact that wooden floats are very popular, it is quite difficult to make them yourself, without the use of special equipment. The problem is also related to the fact that not every tree can produce a high-quality float that meets the requirements of the angler.
Many craftsmen have gotten used to turning the body of the float with a drill or screwdriver, but this requires special skills. In any case, you can experiment on a regular tree, and then move on to softer rocks from which you can make a float.
Alternatively, you can try to make a bamboo float, but this also requires certain skills. Such floats either need to be made, but only high-quality ones should be made, or not made at all.
Video “Float made of wood”
Do-it-yourself float Making Chubber
How to make a sliding float with your own hands
When you want to make a long cast or fishing depth is greater than the length of the rod, then you need a sliding float. How to make such a float or how to ensure the mobility of the float? This is done elementarily by securing the float accordingly. The meaning of the sliding float is that the float slides along the line within two stops that control its movement. The lower stop prevents the float from sinking very close to the sinkers, and the upper stop limits the depth of fishing. The lower limiters allow you to make long casts without problems. Limiters can be made independently or purchased in a store, especially since they are not expensive. For such gear, any type of float is suitable, the main thing is to ensure that it slides. Alternatively, you can offer to make a special float, inside which there is a hollow tube through which the fishing line is passed. Thus, a sliding float is obtained, it remains only to fix the limiters. Beads of a neutral color can be used as limiters (stoppers).
If you plan to make long casts, then the float must have the right weight, as a light float will not fly far.
Video “How to make a sliding float”
Do-it-yourself sliding float for fishing tackle